How to Prepare and Store Your Grill during the Cold Months

A backyard barbecue covered in snow.

For many, the end of one year and the beginning of a new one means chilly weather and no grilling.   It’s important to prepare, protect, and store your grill for those cold months.  Here are some basic tips to help ensure your grill will be ready come next spring:


Step 1:

Start by giving your outdoor grill a good cleaning.  Many people first start the grill up and let it run on high heat until all of the food is burned off of the grill plate. Then take a wire grill brush and scrape all of the leftover food off of the grill surface and get things nice and clean while the grill is hot (make sure to use gloves!). After the grill has cooled, you can use soapy water to help with the cleaning process or you can even use oven cleaner to help with the tough spots. Make sure you thoroughly rinse the grill grates off with water to remove any soap residue.

Step 2:

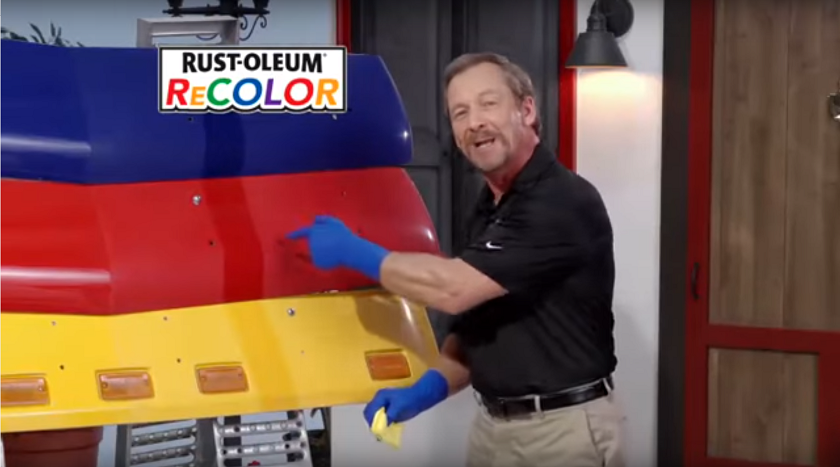
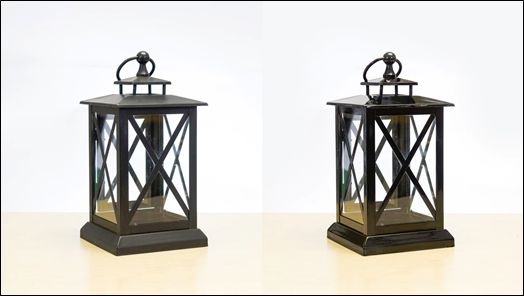
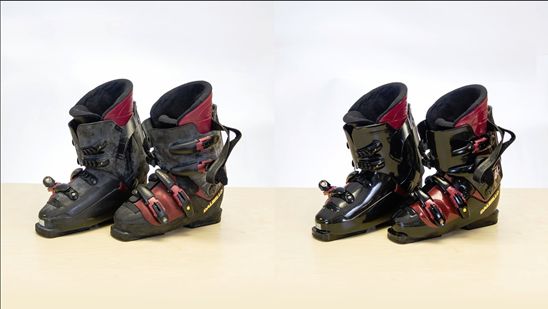
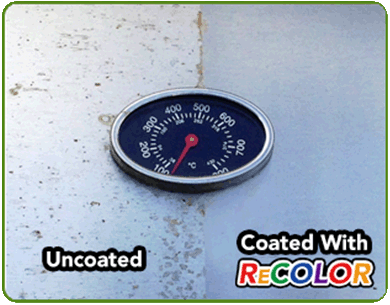
Wipe down the outside of the grill with a damp cloth. Take an old rag and a bucket of hot soapy water and clean every surface of the grill including the tank and all hoses. You can even clean and wipe down the inside of the lid where all of that carbon build up exists.   Once the outside of your grill is dry use some Rust-Oleum ReColor by Wipe New to bring back the shine and to help protect your grill from the elements.

recolor-grill-before-after-02

Step 3:

Shut off the gas at the LP tank and unfasten the burner, slip the gas tubes off the gas lines, and lift out the unit as a whole. Coat the burners with cooking oil to repel moisture that can build up over the winter and to prevent rust. Wrap the burner unit in a plastic bag to keep spiders and insects from nesting in the gas tubes during the winter.


Step 4:

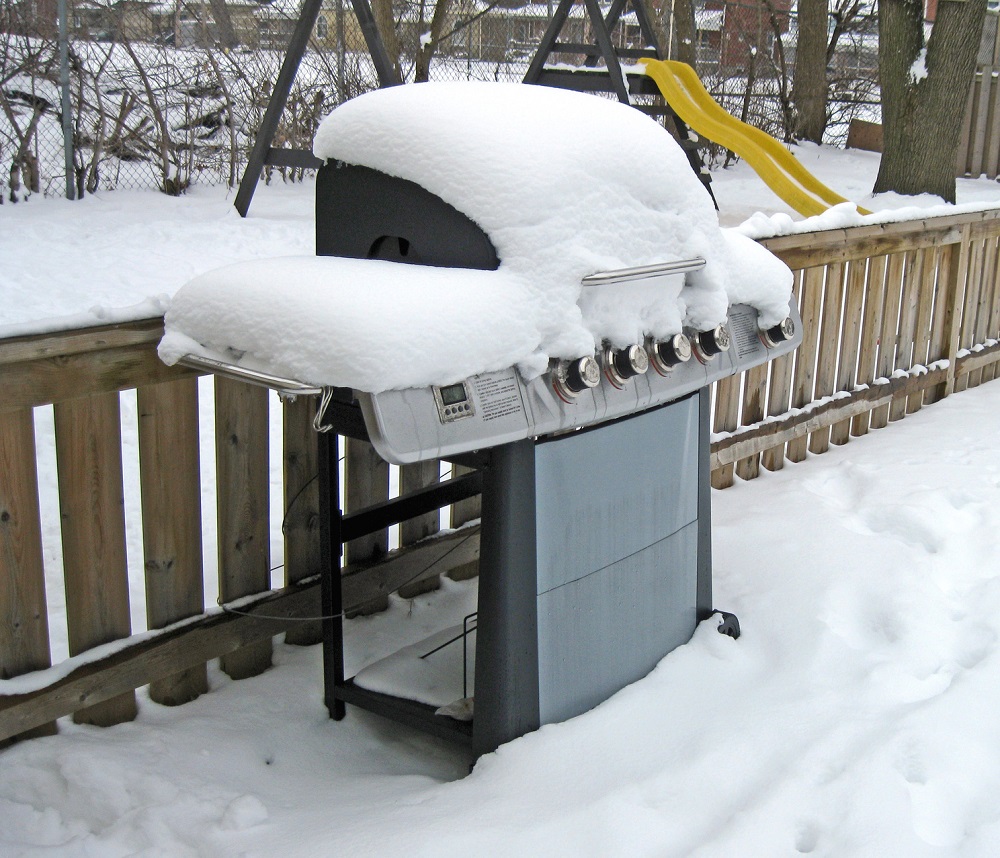
Purchase a good grill cover to keep the dirt, rain, and snow from accumulating on the grill. If you are using a grill cover from last year, make sure that it is still in good condition and has no tears or holes. Make sure your grill and cover is completely dry before storing them.  If possible, store your grill inside in a dry location away from the elements.

A DIY Tic-Tac-Toe Garden Table for the Kids!

diy ic tac toe garden table wipe new recolor
Source: Hometalk

Here’s a great way to create some outdoor fun for the children in your life!  This DIY Tic-Tac-Toe garden will look fabulous in your backyard and it’s really easy to create.

First, find a small round wooden table top at your local hardware store or thrift shop.  Create the tic-tac-toe lines with a wood burner or some permanent paint.  Stain your tabletop and seal the surface after staining. Then treat it with Rust-Oleum ReColor by Wipe New to shine it up – and to preserve it from rain or water damage.  Then simply attach it a tree stump and buy some stones (or other items) to use as pieces to play the game.

Get the step-by-step directions on Hometalk and enjoy your tics, tacs, and toes!

Get Ready to Ride Again: Preparing Your Bicycle for Spring!

It’s been sitting in your garage or basement during the winter months and is calling you to take it outside again.  The warm weather is coming and your bike wants to go for a ride!  Are you ready too?  Is your bicycle ready?

recolour-by-wipe-new-bicycle-care

Explore some tips from Rust-Oleum ReColor by Wipe New on how to prep your bike for that first Springtime ride:

  • Check your tire pressure! Modern bicycle tires are pneumatic so tire pressure plays a huge role in how your bike is going to ride. Properly inflated tires not only give you lightweight suspension; but they also let your bike roll quickly, fend off flats, and simply ride more smoothly
  • Inspect the chain and freewheel. Measure the chain for wear, check for tight links and replace the chain if necessary
  • Creak, creak! If your bicycle is making some noises you should pay attention. A creaky crank may be loose on the spindle. To address, remove the crank bolts, lubricate the threads, and then reinstall.  If your saddle creaks, drip a few drops of oil on the rail where it connects to your saddle.  Use a light lubricant to silence squealing rear-derailleur pulley wheels.
  • Inspect tires for wear. Rotate or replace them if necessary. 
  • Visually inspect for bent components: this should include crankarms, seat post, seat rails, chainrings, stem, handlebars, brake levers, and brake calipers.
  • Inspect the frame for frame or part damage. Make sure you pay close attention to all frame joints.
  • Check all cables and housings for fraying, breaks, rust and corrosion. Replace as needed.
  • Check your brake pads. If the grooves in the brake pad is almost gone, if you hear a gritty scraping sound, or you feel stickiness whenever you brake; then it’s likely you need to replace brake pads.
  • Lubricate your chain. Remember that not all chain lubricants are the same. Choose the one that you feel best suits the riding conditions.
  • Clean her up! Completely clean the bike, including the drivetrain if needed.  Get two buckets:  one with clean water, and the other with water plus a little dish soap or degreaser. Soak your bicycle with plain water using a clean sponge. Then grab a second clean sponge, place it in the soapy water and proceed by scrubbing the frame, then the wheels and spokes, and then drivetrain if need be. Soap the brush and then scrub the chainrings, cassette, and rims. Soak sponge in the clean water and use it to get all the soap off of the bicycle. Do that 2-3 times and then go over the whole bike again with a clean sponge with little water. Dry the bicycle with clean rags and use a separate clean rag to swipe the nooks and crannies dry.

Then the really important step!  Grab some ReColor by Wipe New and give your bicycle a super-big treat!  ReColor has a proprietary nano-polymer formula that penetrates deep and will both protect and restore your bicycle for years against elements including fading, sun, oxidation, and water damage.  It’s super convenient to do and easy to use!  Your bike will love you for it!

Looking for more bicycle maintenance tips and tricks?  Check out this article from Bicycle.com at http://www.bicycling.com/maintenance/bicycle-maintenance/101-bike-maintenance-tips


ReColor by Wipe New and DIY Tin Tile Backsplash

Creating a tin tile backsplash is a fairly easy and inexpensive project.  These tiles come in a variety of colors, designs, and finishes.  Most have reflective properties that can brighten your kitchen.  They are easy to clean and installing them is typically a quick process.

How to Install a Tin Tile Backsplash (from DIYnetwork.com)

Use ReColor by Wipe New to protect the shine after installing your tin tile backsplash.

Source: DIYnetwork.com

*NOTE:  Please read and follow all the directions for ReColor by Wipe New.  When applying Rust-Oleum ReColor by Wipe New, wear the protective nitrile gloves and always use it in a well-ventilated area.

ReColor Suggests Ways to Brighten your Home during the Winter Months

Are these dark, dreary, cold Winter days giving you the blues?  Now that you’re spending more time indoors, do you wish you could bring in more light, more color, and more cheer INTO your house?

No problem!  ReColor by Wipe New is here to help with these simple changes that can make a big difference!

  1. Use light-colored slipcovers, tablecloths, bedding, and curtains

Invest some money in purchasing tablecloths, curtains, bedding, and sofa/sectional slipcovers that are white, ivory, or a light color.   You’ll be amazed how making these bigger home items a lighter color can make a whole room feel lighter and brighter. Make sure that they are easy to wash to keep them nice and bright over time.

Add a splash of color


  1. Bring in some plants

Plants are a great way to bring “new life” into your home.  Houseplants are known to help improve your mood and, of course, they can help to clean the air in your home. Depending on what plants you use, you can even add some pops of color into your environment.  When it gets closer to spring consider adding vegetable and herb gardens into your house.  You can also occasionally buy some fresh flowers from the market and bring them home for some color!

  1. Remove the window screens

Windows screens are typically not needed during the winter months as most people don’t usually open their windows when it’s so cold outside.  Removing the screens can actually help to bring in more natural light.

  1. Add some color

Highlight your house with pops of color.  Use some vibrant throw pillows.  Add a colorful end table or lamp into a room.  Also add some color on the exterior of your house.  For example, you can place some brightly colored pots on your porch or some brightly colored lawn ornaments in your flower/landscape beds.  Concerned about the winter elements on these items?  No worries!  Treat these items with Rust-Oleum ReColor by Wipe New before placing them outside and rest assure knowing that they’re protected from the wet and cold.

  1. Play with light

Different types of lights can produce different moods for different people.  Some people prefer warm white and others prefer cool white.  Some bulbs work well for one room, while others work well for another.  Switch them up and see what you like best.  Also don’t forget to utilize natural light sources (i.e. candles and fireplaces).  While they don’t make your room brighter, they are warm, peaceful and relaxing after a long day.

Winter home maintenance and projects

ReColor Winter Home Maintenance


If you live in a place that is cold and snowy, often projects around the house get put off until spring. Here are some winter home maintenance and DIY projects you can tackle during the winter months.

  • Always be prepared for winter weather. Keep extra drinking water and non-perishable food on hand in your house and car at all times. Include at least one gallon of water per person per day and have enough for 3 days. Don’t forget a manual can opener! Also, have plenty of batteries and flashlights ready for power outages as well as a crank weather radio.
  • If you have a garden shed or a garage, you can do most projects you would outdoors while being nice and warm. Just make sure you have proper ventilation before you use your ReColor!
  • Did you know that January is national Get Organized month? It’s a great time to declutter! Start by getting rid of old clothes that you don’t need, wear, or that you don’t like and take them to a clothing donation center or bin. Don’t try and tackle the entire house at once – start small and go slowly.
  • Winter’s a great time to work in the bathroom! Clean up the grout and tiles (and maybe apply some ReColor to those tiles while you’re at it to really keep them shiny). A new shower curtain in bright colors can do wonders for brightening up a bathroom, and maybe get some new towels to match.
  • Add insulation. While it’s not a pretty, shiny, or glamourous task, adding insulation to your home will help to lower your utility bills and make your home more eco-friendly. How do you know if you need more insulation? Crawl up in the attic, and if you can see the floor joists you need some more insulation (remember: heat rises!)


It’s easy to get cabin fever this time of year, so keeping busy with home projects can help.


Watch the New Rust-Oleum ReColor by Wipe New Commercial!

Wipe New Recolor


Rust-Oleum ReColor, brought to you by the Award Winning brand Wipe New, is a clear coating that restores original color and shine to multiple surfaces types INSTANTLY! The wipe-on application is easy to do and allows Rust-Oleum ReColor to go on where paint cannot!


Watch the full commercial below to learn more:

Light the Way with ReColor

Winter is a time of reduced sunlight, making it more important than ever to have good lighting around the house. But during the day, you still have to look at the lanterns and light fixtures! Make sure that they are bright, shiny, and great to look at during the day with ReColor, the no mess alternative to painting.

light-the-way-with-recolour-wipe-new

Rust-Oleum ReColor by Wipe New® is the first ever wipe-on clear coating and sealant designed to wipe away years from outdoor furniture, grills, shutters, fixtures and more in just a few minutes! There’s never been a better way to protect and restore! First, clean and dry the surface. Then simply remove the pre-soaked starter cloth from the package and wipe over the target areas for a shiny new look. Unlike traditional coatings, ReColor does not lay on top of the surface. Instead, it becomes one with it restoring original color while adding new properties that protect the surface from UV and liquids to keep it looking new for years! That’s right! Our proprietary nano-polymer formula penetrates deep to protect and restore for years against elements including oxidation, fading, sun and water damage and more!

Learn more at http://www.wipenew.com/recolor/

Sun, Snow, and ReColor by Wipe New?

Many people love winter sports such as skiing, snowboarding, and ice skating.  But the sun and snow can take a toll on the equipment!

rustoleum-wipe-new-recolor-winter-sports

Here’s where ReColor comes in. Are your ski boots looking faded? Don’t buy new ones – ReColor them! Here’s an example of the power of ReColor – saving you money and keeping you looking great on the slopes.

What do you Wipe New? Join the conversation using #Recolor on your favorite social media.

Outdoor Winter Holiday Decorations and ReColor by Wipe New

Wintertime may mean longer and darker days, but is also means scenes of bright and colorful lights!  Winter is a season filled with holidays that shine!

Celebrate the holidays this year by considering these outdoor holiday decorations ideas:

  1. Porch Corner Display: Make the most of sheltered porch corners with an impressive and simple display of candles and greenery. Grab a small table and make a display with some holiday fabrics, battery operated candles, lanterns, and pinecones.   Use a bit of ReColor on the metal lanterns to help make them shine and to help protect them from the weather!
  1. Candy Cane Holder: This is a classic look and looks great by your front door.  Fill a white planter with store-bought plastic candy canes.  Wrap a red, weather-treated ribbon around the planter to tie things together.  Are you plastic candy canes looking dingy?  No problem.  A simple wipe of ReColor can help to bring them back to life!

wipe-new-recolour-candy-canes

  1. Matching Garland and Door Display: Dress up your entryway with a festive garland that you customize with ornaments that coordinate with your door color. Position the garland outside the door frame and secure at the top and sides with self-adhesive hooks or brick clips.  Wrap some lights around the garland to brighten up the nights.  Give your ornaments a new shine with some ReColor and watch them glisten and sparkle in the light!

wipe-new-recolour-garland-door

  1. Porch Bench Display: Give your porch bench some holiday spirit with an arrangement of greenery, pinecones, and ornaments. Spray the greenery and pinecones with a light dusting of fake snow, shine up your ornaments with ReColor, add some lights and you’ve created a wonderful – and welcoming – holiday display.

We also want to encourage you to keep things safe during the holidays by following these guidelines when using lights outside:

  • Before using lights outdoors, check labels to be sure they have been certified for outdoor use.
  • Check each set of lights, new or old, for broken or cracked sockets, frayed or bare wires, or loose connections. Throw out damaged sets. Always replace burned-out bulbs promptly with the same wattage bulbs.
  • Only use outside lights that have been tested for safety by a recognized testing laboratory, such as UL or ETL. This indicates conformance with safety standards. Use only lights that have plugs containing fuses.
  • If using an outdoor extension cord, make sure it is rated for the intended use.
  • Fasten outdoor lights securely to trees, house walls, or other firm supports to protect the lights from wind damage. Use only insulated staples (not nails or tacks) to hold strings in place. Or, run strings of lights through hooks (available at hardware stores).
  • Stay away from power or feeder lines leading from utility poles into older homes.